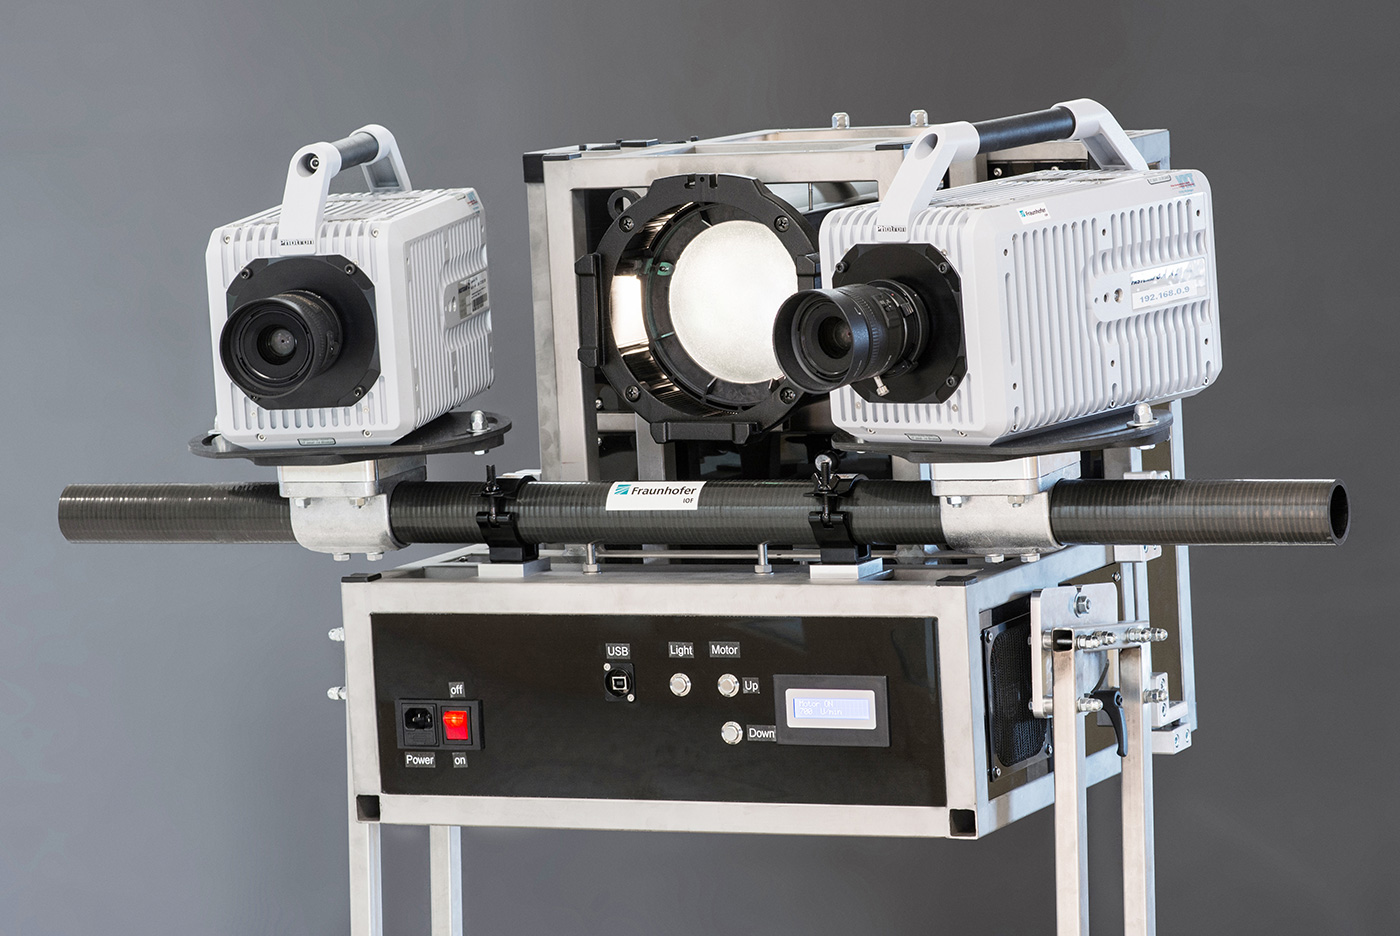
Research Reports: 3D sensing

Recent 3D sensor technology developments at Fraunhofer IOF

Fraunhofer IOF offers the development of innovative optical measurement methods and systems according to customer-specific requirements. This includes optical 3D measurement systems with high metrological accuracy for a wide range of applications.


Could a 3D sensor system be a solution for your measurement problem?

Find out about our technologies, applications, and range of services for customers from industry and science by clicking here:

3D measurement at Fraunhofer IOF


Below you will find research reports on recent 3D sensor developments:

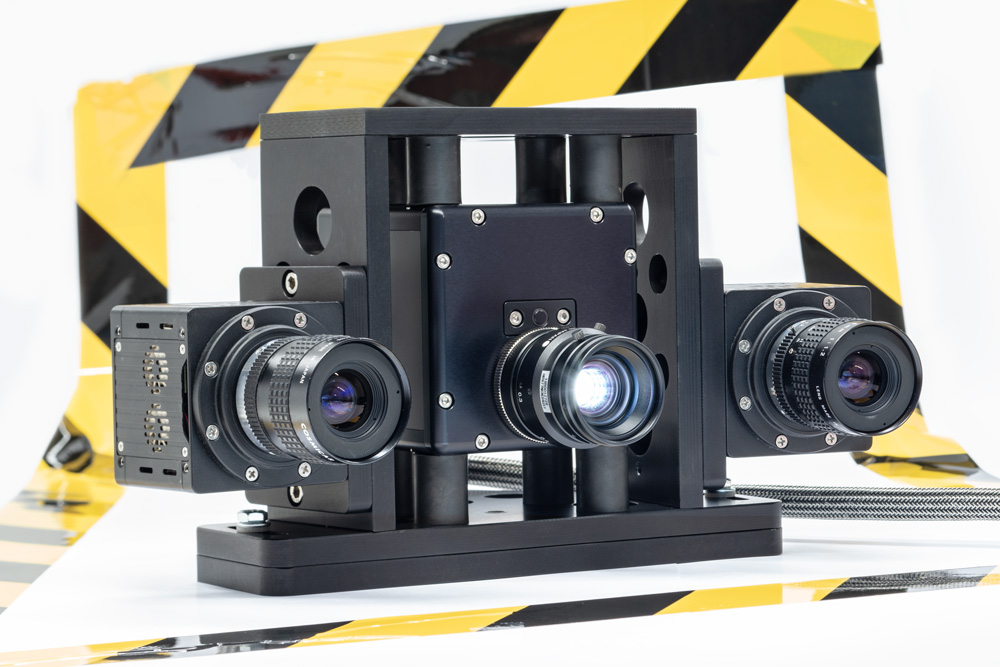
At Fraunhofer IOF, camera systems are developed for many different fields of application.
© Fraunhofer IOF
At Fraunhofer IOF, camera systems are developed for many different fields of application.

Mobile sensor stage for quality management

A 3D sensor overlooks the scene and registers both a person's gestures and the presented components.
© Fraunhofer IOF
A 3D sensor overlooks the scene and registers both a person's gestures and the presented components.


Tasks of industrial quality management are performed increasingly by high-precision 3D measurements of the component to be checked. A complete high-precision three-dimensional acquisition of complex objects with subsequent automatic comparison with the CAD model, however, requires considerable effort in terms of time. Additionally, such measurements cannot be inserted into the production process without a reduction in velocity. Hence, visual check by a human is still an important task in the quality management process. However, a combination of the complex cognitive skills of the human with the precision and endurance of the 3D measurement device may improve the checking process significantly and make it more effective.

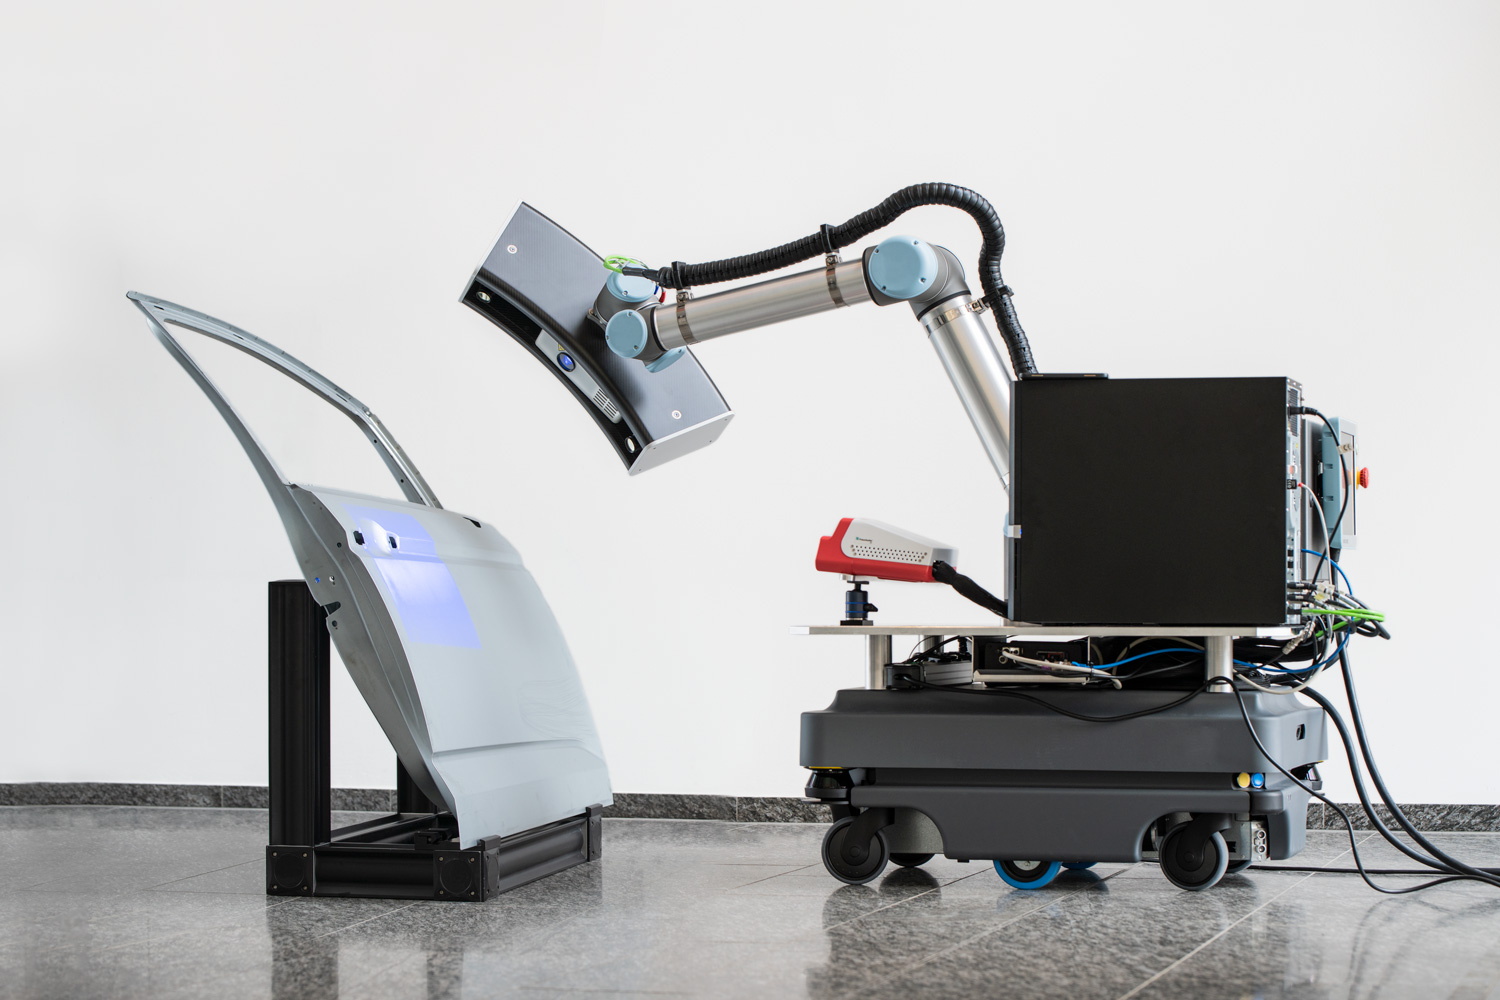
The collaboration between partners from industry and research in the 3Dsensation project “3D-KOSYMA” led to the development of a demonstrator system which realizes 3D-checking tasks through the interaction of human and machine. These checking tasks can be performed at certain positions on the target after finger-pointing by the human which were unknown before. This possibility makes the demonstrator system effective and flexible. The demonstrator consists of mobile platform, an irritation-free 3D interaction sensor for observation of the working space, a 3D checking sensor (CS), and a six-axis robot for positioning of the CS. The CS is exchangeable to use the optimal  measurement device for each application case.

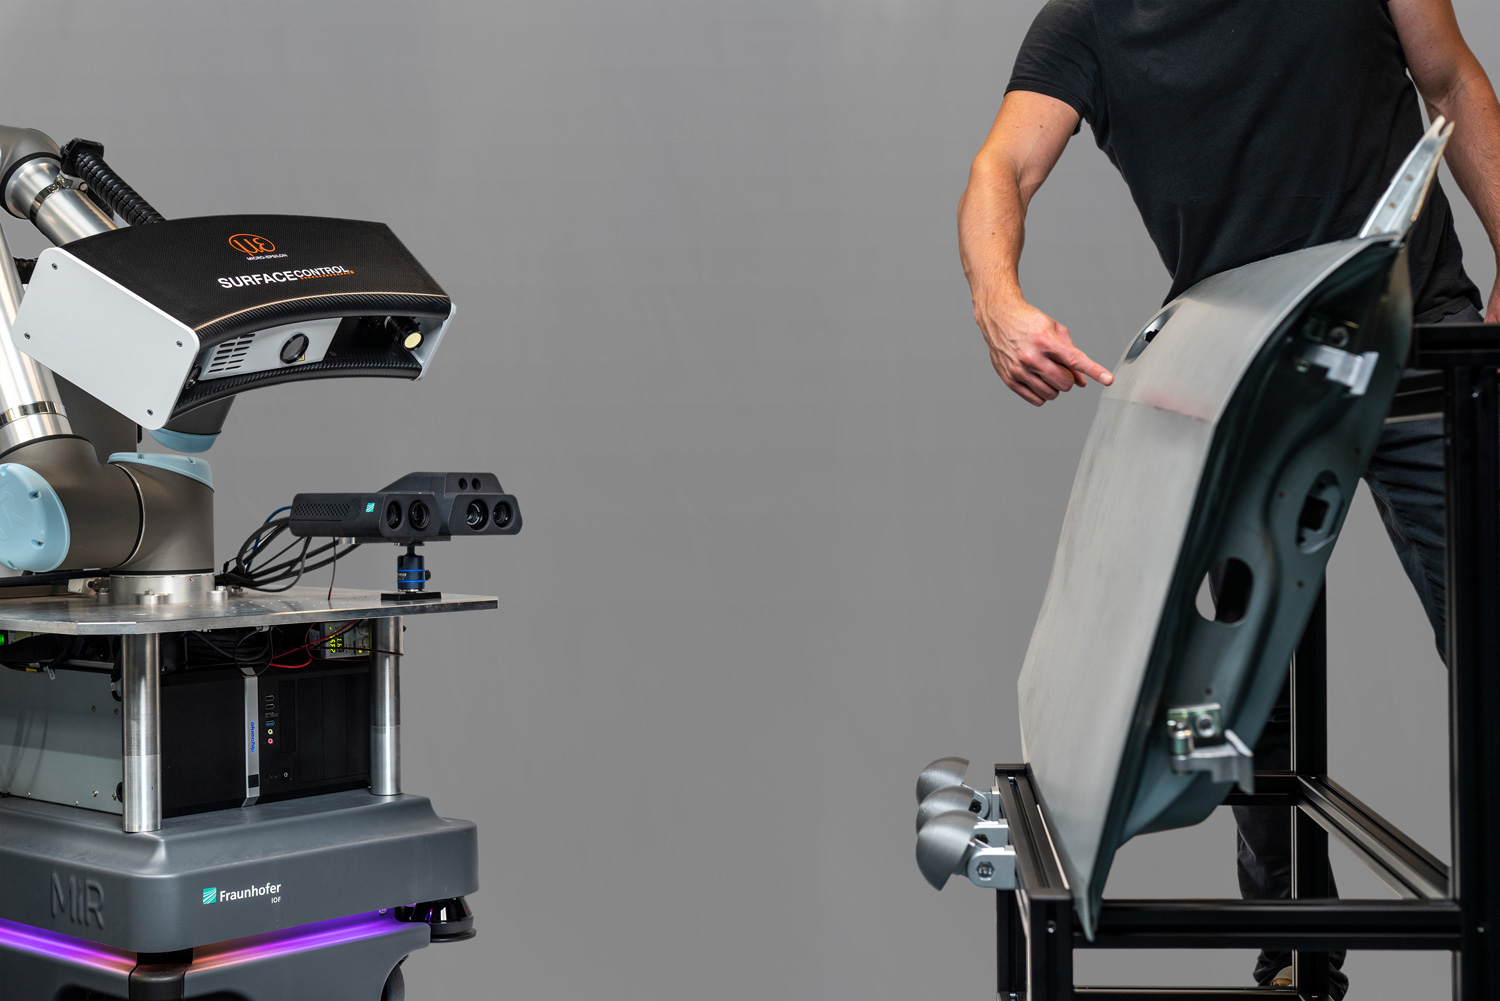
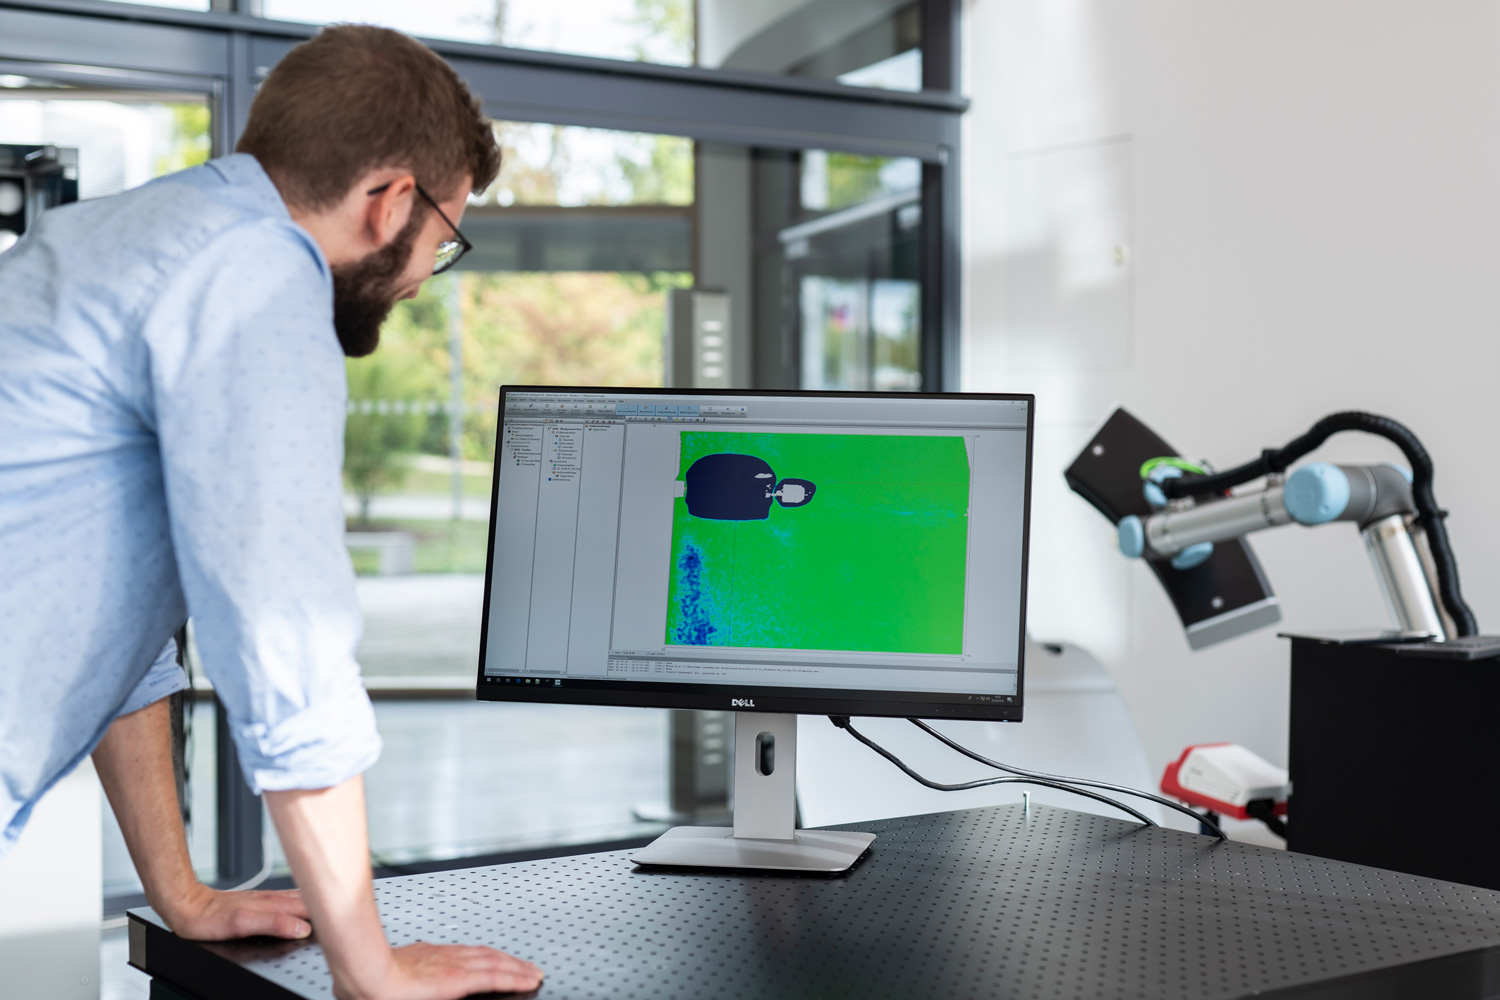
The checking process is initialized by a pointing gesture from the human in the case of receiving visual awareness of a manufacturing defect. In this case, the human indicates the corresponding area to be checked on the target. The demonstrator system detects the pointing gesture and determines the intersection point of the pointing direction with the target surface. Consecutively, the robot moves the CS to the checking area after calculation of the optimal robot path. After performing the checking measurement, the 3D points obtained can be compared to the CAD model. The result will be displayed on a screen.

The mobile platform serves for the placement of the demonstrator system. It can be used additionally for CS movement to the checking position, e.g., if the workpiece is larger than the range of motion of the robot. The demonstrator provides the possibility of a fast, flexible, individual, and interactive marking, e.g., of checking positions without the necessity of arduous a priori robot programming. Future applications can use this technology for checking along the process chain.


The 3D sensing system measures a car door. The sensor recognizes human gestures and examines the location indicated by a finger point.
© Fraunhofer IOF
Fig. 1: The 3D sensing system measures a car door. The sensor recognizes human gestures and examines the location indicated by a finger point.
Demonstrator system on mobile stage and checking object with inspection region.
© Fraunhofer IOF
Fig. 2: Demonstrator system on mobile stage and checking object with inspection region.
On the computer, employees can examine the damage detected by the sensor and then make decisions on how to proceed in the manufacturing process.
© Fraunhofer IOF
Fig. 3: On the computer, employees can examine the damage detected by the sensor and then make decisions on how to proceed in the manufacturing process.
 

Further research reports on 3D sensing


The articles listed below underline, among other things, the intensive research activities of our experts at Fraunhofer IOF. These articles are published in our annual reports, which contain selected research results from the previous year (archive annual reports).

In the following list you will find the articles on developments regarding 3D measurement systems from the past years:


High-speed 3D sensor for interior detection in crash tests

High-speed 3D sensor developed at Fraunhofer IOF.
© Fraunhofer IOF
High-speed 3D sensor developed at Fraunhofer IOF that not only takes high-resolution images but can also withstand accelerations of up to 100 g.


Ongoing improvements in vehicle performance, which are associated with higher speeds, and a general increase in road traffic are leading to higher demands on the safety of passengers as well as other road users. The necessary safety equipment and the car body itself, therefore, must be tested thoroughly. For instance, the deformation of body parts during a crash test or the inflation process of the airbags need to be investigated. For a few years, such dynamic processes have been measurable three-dimensionally using the principle of GOBO projection of aperiodic sinusoidal patterns. Using a newly developed crash-proof high-speed 3D sensor, for the first time, it is now possible to three-dimensionally capture areas of the vehicle interior during a crash test.

This is accomplished by an extremely compact pattern projection sensor consisting of a mounting frame, two high-speed cameras, and a GOBO projector, which has been optimized to meet the requirements for acceleration resistance. Due to the fact that during a safety test, accelerations of up to 100 g act on the sensor system for a fraction of a second, the holding frame was designed to be extremely rigid and the GOBO projector was mounted vibration-damped using metal-elastomer couplings. The 3D data is reconstructed by a stereo correspondence algorithm followed by triangulation.

The sensor system can capture up to 6,000 2D images per second and is capable of subsequently measuring objects in a measuring field of 700 mm x 700 mm with a 3D data rate of 500 Hz to 1 kHz at a lateral resolution of 0.7 mm x 0.7 mm. In this way, processes with a duration between 20 and 500 ms can be recorded three-dimensionally. With its compact dimensions of 300 mm x 180 mm x 170 mm (L x W x H), the sensor system can be used for a wide range of applications, such as sled tests in the vehicle interior, for measuring local deformations within the car body, e. g., in the pedal area, for motion analysis of dummies, or (at reduced resolution) for recording the deployment of various airbags.


Crash-proof high-speed 3D sensor.
© Fraunhofer IOF
Fig. 1: Crash-proof high-speed 3D sensor.
© Fraunhofer IOF
© Fraunhofer IOF


Authors: Kevin Srokos, Stefan Heist, Peter Kühmstedt, Gunther Notni

High-speed 3D thermography

High-speed 3D thermograph.
© Fraunhofer IOF
At Fraunhofer IOF, a high-performance thermal imaging camera was integrated into a high-speed 3D sensor to combine the measurement of thermal data and 3D shapes.


In recent years, researchers worldwide have focused on increasing the measurement speed of optical 3D sensors based on pattern projection. While 2D cameras achieve frame rates in the double-digit kilohertz range, new projection techniques had to be developed that allow for fast pattern switching and extremely short exposure times. The “3D Sensors“ working group at Fraunhofer IOF has made a significant contribution to this progress with completely new approaches, e. g., by developing the principle of GOBO projection of aperiodic sinusoidal patterns. Using a GOBO projector and two high-speed cameras, they were able to measure dynamic processes with a 3D rate of 1333 Hz and with up to one million points per 3D data set.

Since very fast processes show local temperature changes, thermal data acquired in addition to 3D point clouds provide valuable information. High-performance thermal imaging cameras with frame rates of 1 kHz at 640 × 512 pixels have recently become commercially available. The scientists at Fraunhofer IOF successfully integrated such a long-wave infrared (LWIR) camera into their high-speed 3D sensor, taking into account that the projector does not influence the thermal images in the LWIR. With their design, the researchers are able to map the measured thermal data as a texture onto the reconstructed 3D surface shape.

A particular challenge was the geometric calibration of the overall system due to the completely different spectral ranges of the two acquisition units. The Fraunhofer IOF scientists developed a calibration object with  structures that can be detected both in the visible wavelength range as well as in the LWIR. They found the solution in materials with very different emissivities so that the structures can be recognized even with a homogeneous temperature distribution. In addition, the selected materials exhibit different reflection properties in the visible spectral range.

The high-speed 3D thermograph was tested in various experiments, including measuring an airbag explosion. The 3D frame rate was 5 kHz, whereas an LWIR frame rate and, thus, also a 3D thermogram rate of 1 kHz was achieved. Local temperature differences can be used, for instance, to obtain information on material thicknesses and material flaws. The sensor can be applied, e. g., for measurements in prototype development and quality assurance, where deformation and heat generation occur.


Authors: Martin Landmann, Stefan Heist, Patrick Dietrich, Ingo Gebhart, Gunther Notni

On-site 3D scanning of crime traces and cultural heritage

Mobile 3D scanning simplify the digitization of cultural goods.
© Fraunhofer IOF
Mobile 3D scanning simplifies the digitization of various objects, such as cultural goods.


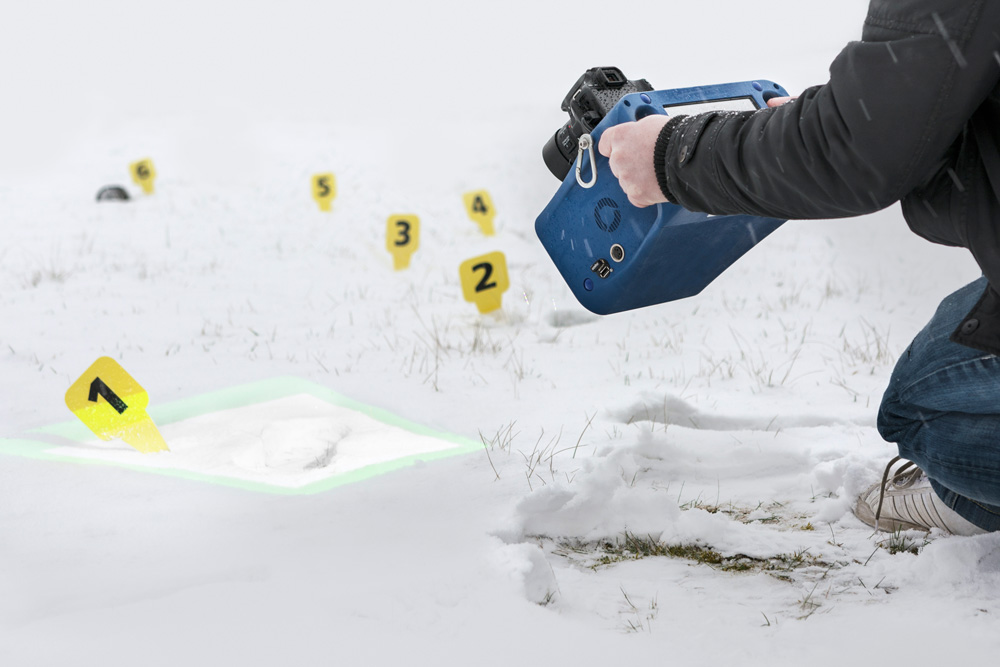
The majority of optical 3D scanning systems are used in stationary operation mode at a fixed location, e. g., in industrial quality control. Applications, such as the recovery of traces at crime scenes or the digitization of cultural heritage, require the 3D scanning of objects directly on-site because these objects cannot be moved or may be very sensitive. A mobile 3D scanning system including synchronous color/texture acquisition was developed and evaluated in user tests in the context of the “3D-Forensics/FTI” European funded project as well as the “cultur3D” project from Friedrich Schiller University Jena.

The mobility of the system is realized through a compact, portable, and battery-driven scan unit. Its on-site operation requires no additional equipment. The device is transported in a trolley case to changing locations, e. g., crime scenes, museums, or excavations. Both the recovery of evidence at crime scenes and the digitization of cultural heritage have the objective to combine high-resolution 3D data with color photos. The developed scan unit consists of a stereo camera setup combined with a pattern projector for 3D data acquisition. It captures the 3D form with a resolution of 0.17 mm in a measurement volume of 325 x 200 x 100 mm³. Color acquisition is performed by a calibrated digital photo apparatus with 30 MP. The 3D scanner is designed for an operating temperature between -10 and +40 °C. Together with an IP22 protection class, it is suitable for outdoor applications. The control of the device is achieved through an integrated touch display. The handling is similar to a standard photo apparatus. It is possible to improve data quality by using the scan unit in connection with a tripod.

The mobile 3D scanner is of interest for the recovery of evidence at crime scenes, e. g., to detect the smallest details in footwear impression traces which help to identify suspects. A group of forensic testers supported the development of the device through pilot tests in relevant operational environments (Fig. 1).

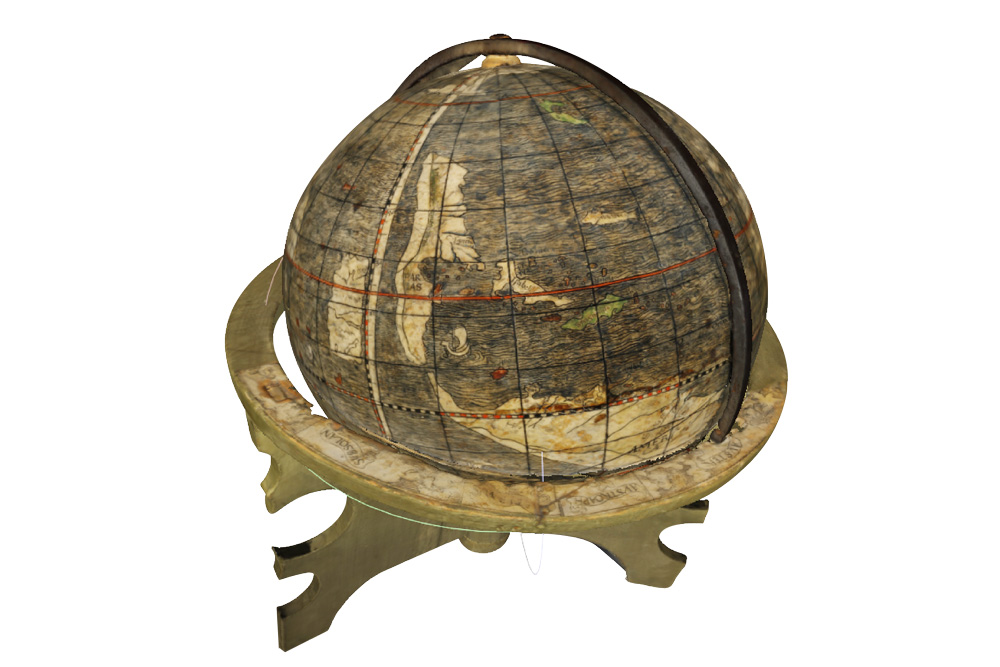
A validation following the “Forensic Science Regulator” was performed in the context of the “3D-Forensics/FTI” project to test the system’s fitness for purpose and the judicial admissibility of the captured data. As a result, unique cultural artifacts can be digitized without risky transport to a stationary scanning system by using the mobile 3D scanner. Digitization can be performed directly on-site, e. g., in the archive of a museum. The 3D and color recordings can be merged automatically into a complete all-around 3D model by an additional software module developed as part of the “cultur3D” project (Fig. 2), thereby allowing scientific examinations to be performed on this digital replica instead of the actual sensitive object.

Mobile 3D scanning of shoe prints in snow.
© Fraunhofer IOF
Fig. 1: Mobile 3D scanning of shoe prints in snow.
3D digitization of a Schöner globe (from 1515) in Weimar.
© Fraunhofer IOF
Fig. 2: 3D digitization of a Schöner globe (from 1515) in Weimar.


Authors: Roland Ramm, Matthias, Heinze, Peter Kühmstedt, Gunther Notni, Max Lucas (LUCAS instruments GmbH)

Multispectral 3D detection

Multispectral 3D sensors.
© Fraunhofer IOF
Multispectral 3D sensors enable the determination of the spectral properties of objects or scenes.


Multispectral imaging is a powerful technology to determine the spectral properties of an object or scene. Modern multispectral cameras allow the spatially resolved acquisition of the emitted or reflected radiant power in a dozen to several hundred wave-length ranges. Originally developed for remote sensing and astronomy, multispectral cameras are increasingly opening up new fields of application. They are suitable, e. g., for the analysis of valuable art and cultural objects, for the quality control of foodstuffs, or for determining the state of health of plants.

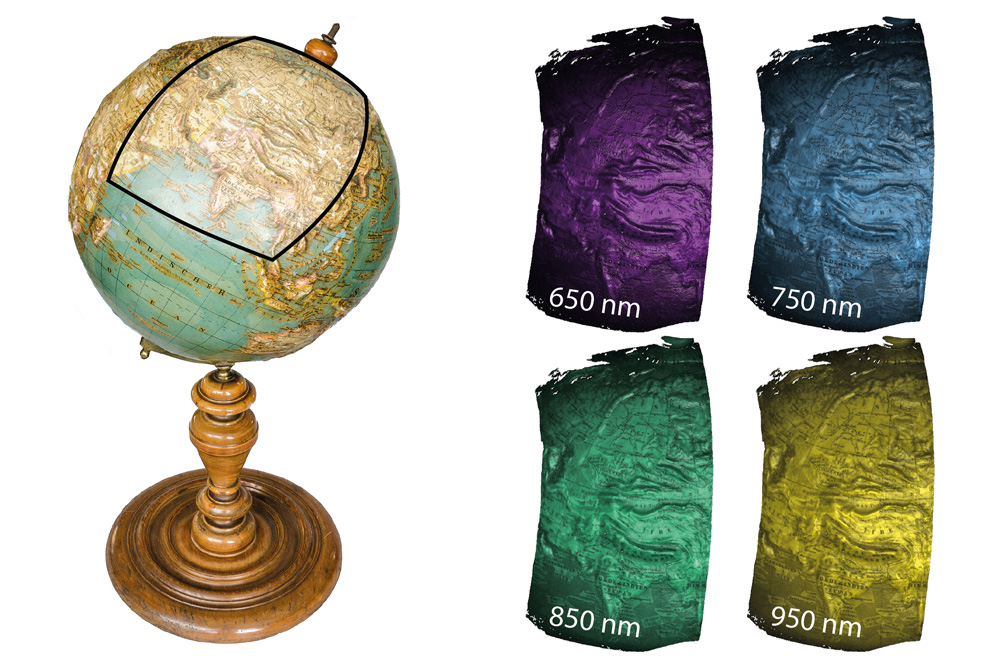
As the shape of the measurement objects has a significant influence on the determined spectral properties, it is advantageous to combine spectral information with three-dimensional surface models. Fraunhofer IOF has therefore developed a sensor, that allows the simultaneous acquisition of these properties up to 17 times per second. The system consists of two multi-spectral snapshot cameras with 25 spectral channels (600 to 975 nm), a high-spee broadband projector  developed at Fraunhofer IOF to illuminate the target with varying patterns, and an additional projector that illuminates the object homogeneously. The developed sensor offers, among other things, a promising non-invasive possibility for the analysis, classification, and
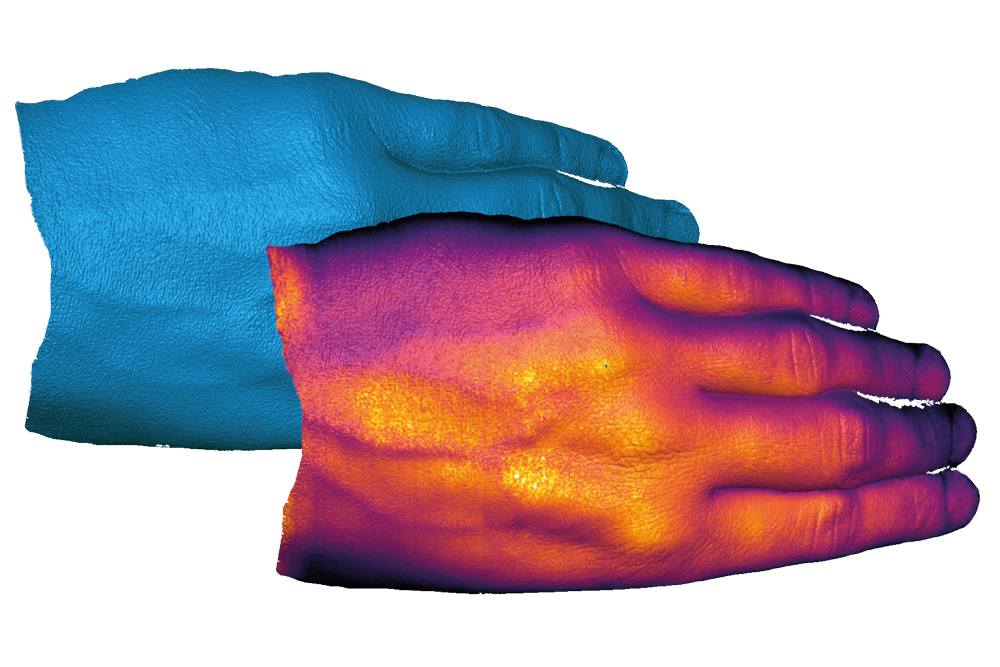
digital preservation of art and cultural assets. The results of  the investigation of a historical relief globe from 1885 shown in Figure 1 illustrate the detailed acquisition of the geometric and spectral surface properties that allow conclusions to be drawn about the materials used. Moreover, multispectral 3D models enable the simplified detection of veins independent of skin tone, degree of dehydration, fat content, or body hair, particularly in the spectral range between 800 and 850 nm. In this way, it is possible to reliably determine which veins are suitable for infusion. Figure 2 illustrates this with the measurement of the left hand of a 26-year-old male subject.

The range of potential applications of the new sensor includes phenotyping plants, observing the healing process of wounds, and investigating the penetration of light into different materials. This opens up a variety of new opportunities for agriculture, medicine, or science. Future investigations at Fraunhofer IOF will aim to optimize the hardware used, to further increase the measurement speed, and to extend the sensor to other spectral ranges.


Multispectral 3D measurement of a historical relief globe.
© Fraunhofer IOF
Fig. 1: Multispectral 3D measurement of a historical relief globe.
3D model of a human hand.
© Fraunhofer IOF
Fig. 2: 3D model of a human hand without and with texture detected in the near infrared.


Authors: Stefan Heist, Chen Zhang, Peter Kühmstedt, Gunther Notni

In-line 3D measurement of honeycomb catalysts

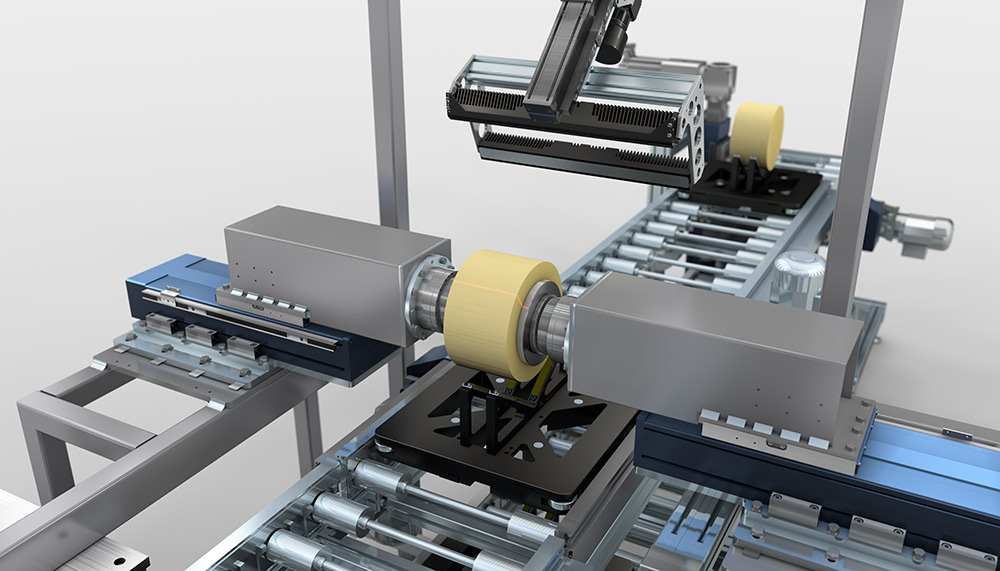
Machine with integrated section for inline 3D measurements.
© Fraunhofer IOF
Machine with integrated section for inline 3D measurements.


In many industrial production plants, 100 percent control of the manufactured goods is a mandatory requirement in the area of quality assurance. In order to be able to guarantee this even at high production rates, specially adapted customer-specific measuring systems are necessary.

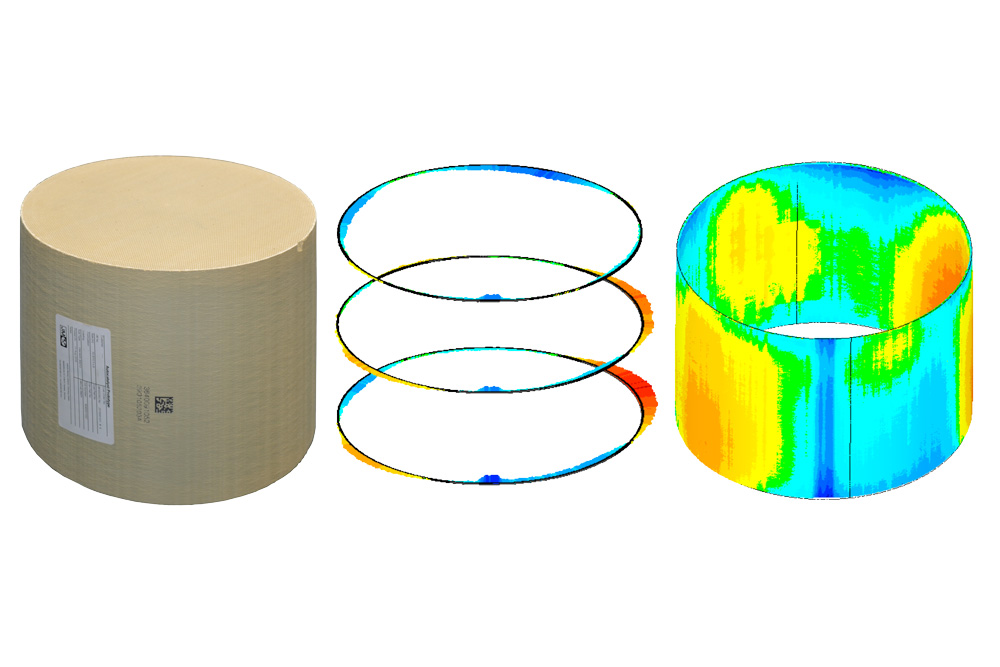
For Johnson Matthey Catalysts GmbH, a fully automatic measuring cell for the optical inspection of cylindrical honeycomb catalysts was developed. Due to their special manufacturing process, ceramic fully active catalysts are more effective than conventional catalysts but are subject to greater geometric fluctuations. They are used for exhaust gas purification in passenger cars, trucks, ships, and power plants. As a result of the large number of different application scenarios, there is a large range of types with diameters from 140 mm to 330 mm and lengths from 100 mm to 300 mm. The entire range of types must be tested in large quantities in a three-shift operation. On one hand, the system must guarantee high reliability, and, on the other, it must react flexibly to increasing on-demand production with changeover times of just a few minutes. The two-stage inspection process begins with the all-round measurement of the shell surface. The catalytic converters are lifted out of the conveyor section by a specially designed mechanical system and rotated around the cylinder axis. Parallel to the 3D measurement, the outer surface is examined with a high-resolution camera for cracks from 100 μm width. The specially designed reconstruction and calibration algorithm allows the calculation of a multitude of geometric dimensions such as different diameters, cylindricity, angularity, or barrel shape. The full-surface measurement also allows local deformations, defects, and break-outs to be detected and interpreted simultaneously. In the second inspection stage, up to 50,000 individual channels are inspected for web breaks, cell closure, and cracks using two 28 MPixel cameras. The results of the 2D image evaluation are differentiated by a complex classification into different crack groups and defect clusters. The measuring cell was integrated into the production finishing line and is characterized by optimized handling for the highest possible cycle rate. The measured data obtained is fed back to the customer's main system and the Manufacturing Execution System and provides the basis for classifying the test specimens for the subsequent sorting robot. The measuring cell and the coupled evaluation unit communicate with each other and with the higher-level end line via industrially standardized communication protocols of the automation technology.

The customer-specific, fully automatic inspection system represents the process coordinated by Fraunhofer IOF for a new development suitable for industrial use, starting with a feasibility study, through the coordination of the interfaces, assembly, commissioning, and up to the final system optimization.


Mechanical construction of the measuring cell.
© Fraunhofer IOF
Fig. 1: Mechanical construction of the measuring cell.
Honeycomb catalyst with 3D cutting lines and lateral surface.
© Fraunhofer IOF
Fig. 2: Honeycomb catalyst with 3D cutting lines and lateral surface.


Authors: Peter Lutzke, Peter Kühmstedt, Gunther Notni

Optical 3D measurement of glass and transparent plastics

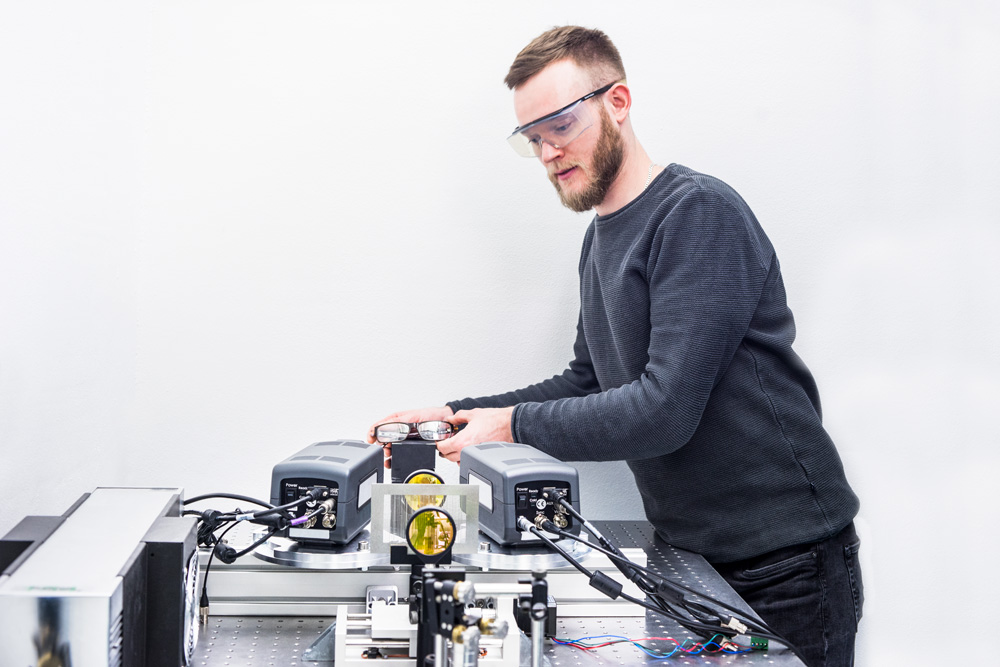
Laboratory setup of an optical 3D sensor for measuring transparent plastics and glasses.
© Fraunhofer IOF
Laboratory setup of an optical 3D sensor for measuring transparent plastics and glasses.


When it comes to non-contact, fast, and highly precise 3D measurements of objects, optical stereo-vision systems developed by Fraunhofer IOF have proven their efficacy for certain applications in industry and research. Based on active pattern projection, new 3D systems with wavelengths in the near infrared offer accurate, irritation-free 3D measurements of humans, e. g. for applications in the field of human-machine interaction.

The basic principle of these 3D systems is the active projection of optical patterns onto the objects’ surfaces, which works successfully in the visible or near-infrared wavelength range for a multitude of materials. Yet 3D image errors always arise if the optical properties of certain materials such as glass or transparent plastics interfere with the process of diffuse reflection.

Fraunhofer IOF has developed a new method which makes the 3D measurement of these reflective or transparent materials possible. For this purpose, thermal patterns (in the infrared about 10 μm) are absorbed from the object’s surface and their re-emission is analyzed with thermographic cameras. The patterns are generated based on a CO2 laser and an adapted GOBO principle which is described in: S. Heist et al.: High-speed three-dimensional shape measurement using GOBO projection, Opt. Laser Eng. Vol. 87 (2016). Glass and transparent plastics become absorbent by changing the spectral range to the thermal infrared.

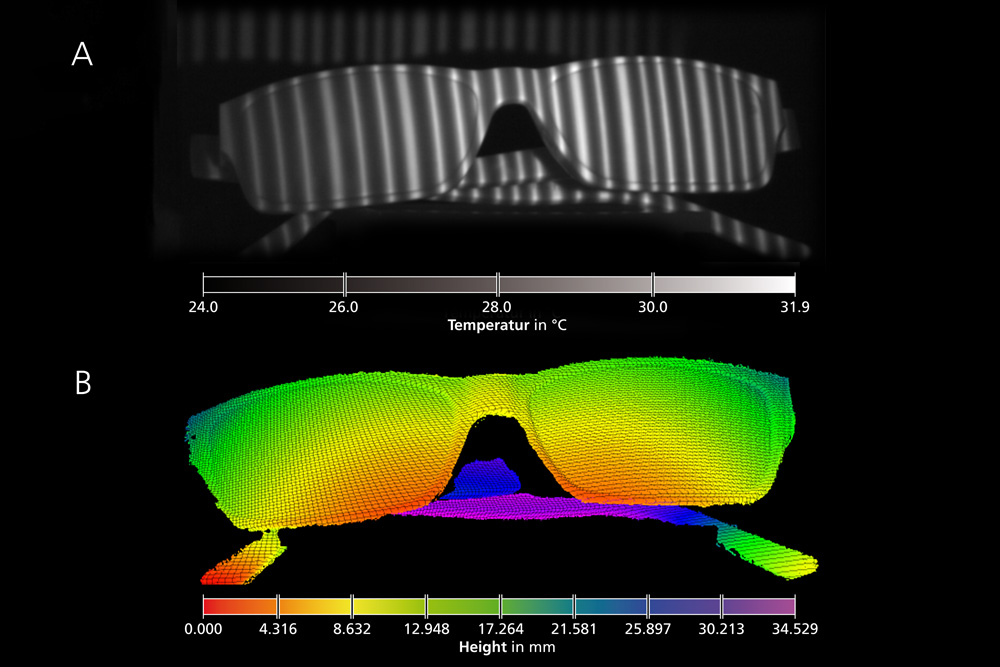
The top of figure 2 shows a thermal image of glasses made from plastics with a typical thermal pattern on the object surface. A thermal contrast of about 1 to 2 Kelvin between pattern and surface is sufficient for the further image processing. The bottom of figure 2 shows a complete 3D point cloud of the glasses which was reconstructed by correlating the image stacks of two thermal imaging cameras after various pattern projections.


3D measurement of glasses, where thermal patterns are projected onto the object surface.
© Fraunhofer IOF
Fig. 1: 3D measurement of glasses, where thermal patterns are projected onto the object surface.
Thermal image of plastic glasses.
© Fraunhofer IOF
Fig. 2: Thermal image of plastic glasses with a thermal pattern on the surface (A). Reconstructed 3D point cloud with color-coded depth information (B).


Authors: Anika Brahm, Simon Schindwolf, Stefan Heist, Peter Kühmstedt, Gunther Notni

Body measurement in motion: high-speed 3D detection

High-speed whole-body recording of a rope skipper.
© Fraunhofer IOF
High-speed 3D sensors developed at Fraunhofer IOF can detect very fast movements, as shown here in the example of a rope skipper.


Whereas the development of technical devices (e. g., smartphones, automotive technology, medical technology) rapidly progresses, the improvement of their interaction with the user plays a minor role. Usually, machines are tools whose operation has to be learned and mastered. In order to realize an adequate human-machine interaction instead, the machine needs to be able to detect and interpret human gestures and facial expressions.

At the Fraunhofer IOF, we have developed various systems that enable us to capture fast body movements three-dimensionally. A sequence of certain patterns is projected onto a person by a newly developed high-speed projector and observed by a stereo camera system. By correlating the camera images and subsequently  performing triangulation, we can generate several hundred to thousand high-precision 3D point clouds per second.

Due to the high radiant flux of its projector, one of the developed 3D sensors is suited for large measurement fields and thus whole-body measurements. Using this sensor, we recorded a rope skipper in motion, a soccer player during a shot, and other highly dynamic processes at a 3D frame rate of more than 1,300 Hz and at a resolution of up to 1,000 x 1,000 points.

Furthermore, we developed a system which features the fast projection and detection of the patterns at a wavelength of 850 nm. By transitioning from the visible spectral range to the near infrared (NIR, being imperceptible to the human eye), disturbing glare effects are avoided. Besides, an additional RGB camera can be used to simultaneously obtain color information. Hence, the developed sensor can be used for detecting and analyzing, e.g., emotional face expression.

The spectrum of potential system configurations ranges from superfast (several kilohertz 3D rate), through very large measurement fields (several square meters) to irritation free. This opens up further possibilities for human-machine interaction, e. g., with regard to interactive training systems, car interior monitoring, or security technology in public space. Future investigations at the Fraunhofer IOF aim to optimize the hardware as well as the algorithms for 3D data computation.
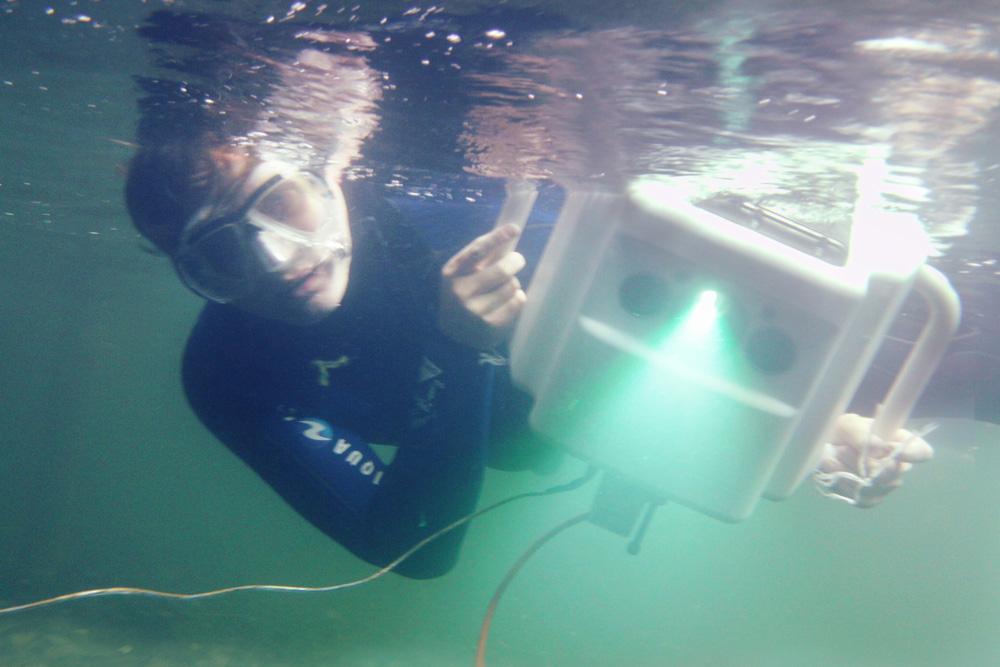
 

NIR high-speed projector.
© Fraunhofer IOF
Fig. 1: NIR high-speed projector.


Authors: Stefan Heist, Peter Lutzke, Ingo Schmidt, Peter Kühmstedt, Gunther Notni

Mobile 3D-scanner for evidence recovery at crime scenes

Mobile 3D-scanner for evidence recovery at crime scenes in snow.
© Fraunhofer IOF
The mobile 3D scanner can be used in various environments, such as in snow, to capture traces.


Optical 3D-sensors are typically built as stationary measurement systems with a fixed location, e. g. in industrial quality control. The design as a mobile 3D-scanner allows the usage of the system at varying locations, e. g. crime scenes. The project 3D-Forensics, funded by the European Union and supported by forensic experts, focussed on the development of such a 3D-scanner based on fringe projection for the recovery of footwear and tyre traces at crime scenes. This application also requires a high resolution level, because details, such as tiny scratches in a sole of a shoe, often lead to the identification of criminals.

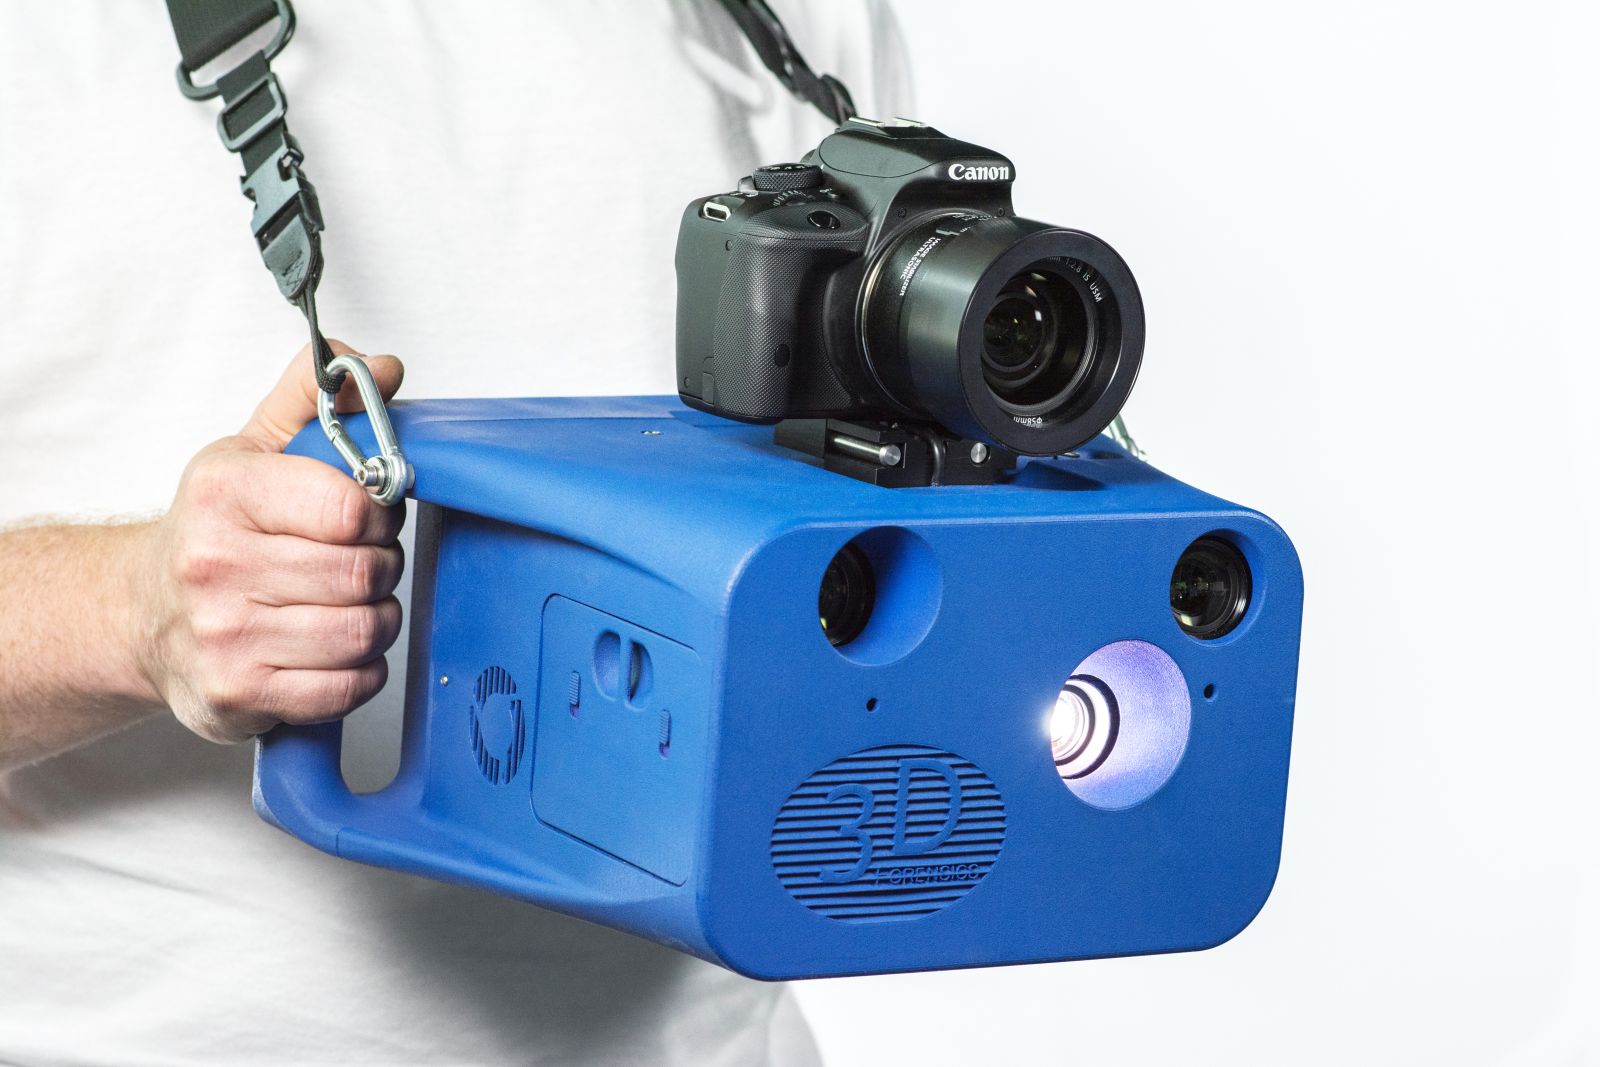
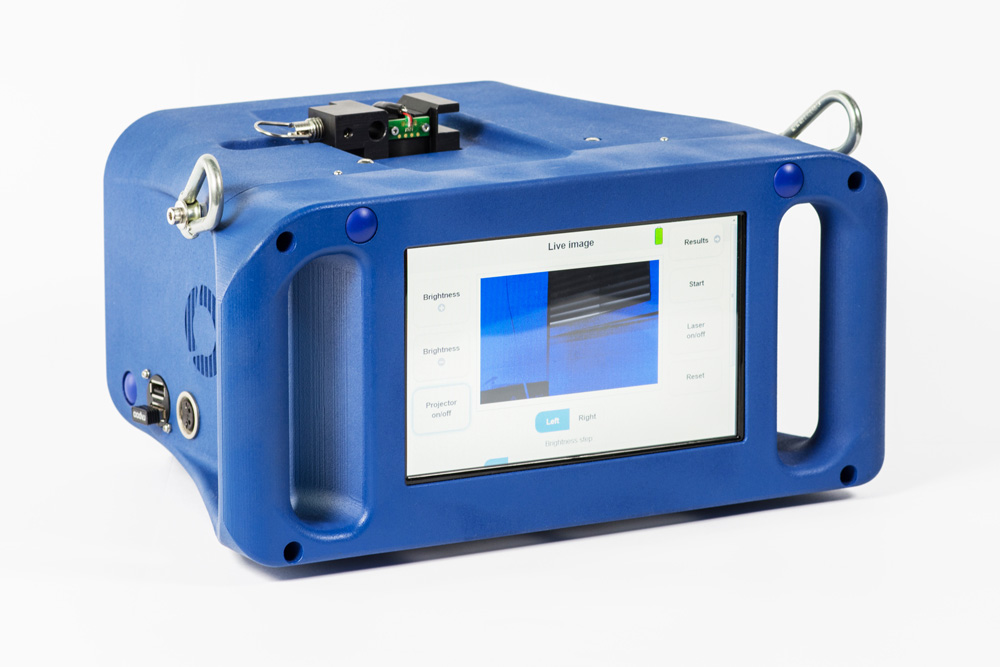
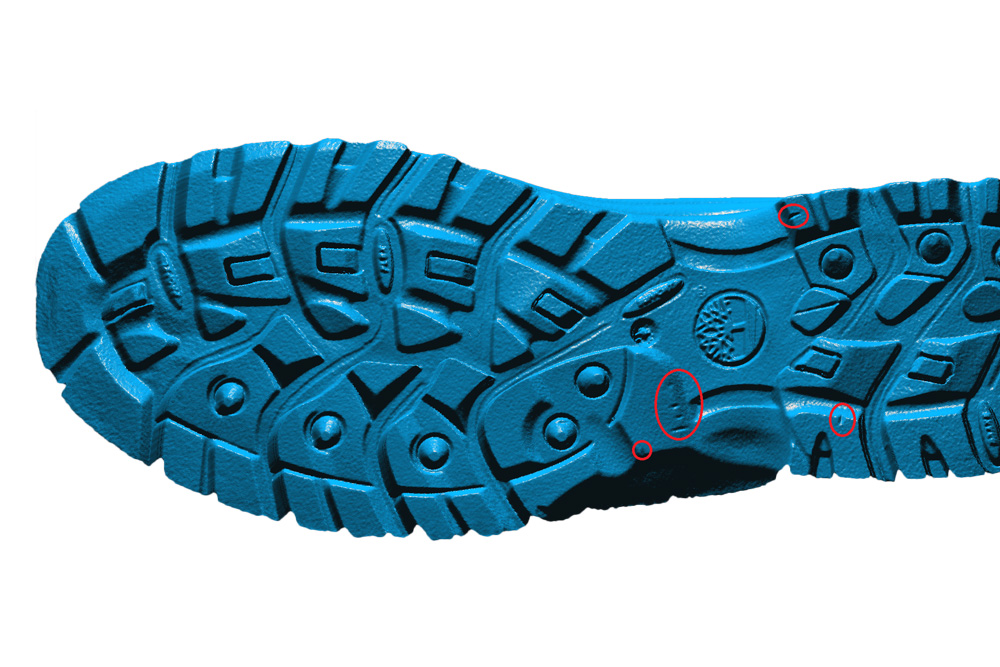
High mobility was achieved by designing the handheld 3D-scanner as a completely self-contained measurement system including an integrated processing unit, operating panel, and batteries (Fig. 1). During operation no additional equipment is required. The 3D-sensor captures a field of view of 325 x 200 x 100 mm³ with up to 2.5 Mio. 3D points with a point pitch of 0.17 mm. The high resolution allows the detection of relevant details in impression traces (Fig. 3). The 3D-scanner contains a digital camera as an attachable add-on component, which captures a high resolution color image calibrated to the point cloud. This can give additional information in the investigation of the trace. Batteries allow the system to be operated for between 30 and 60 minutes. The scanner is controlled on a touchscreen. The control software was optimized on ease of use. The crime scene investigator adjusts the scan position with the live camera image and selects the optimal exposure time depending on the underground. The scan result is directly presented as a preview. The investigation of the traces is carried out with dedicated software, which allows the analysis of the 3D- and color data. The whole system consisting of 3D-scanner and software was further developed with respect to data integrity issues to enable its usage as evidence in court. The 3D-scanner was tested in cooperation with crime scene investigators in environments similar to real crime scenes. The quality of the scan results was compared to plaster casts, which is the state of the art technique used to recover impression traces. The achieved level of detail through 3D-scanning is similar or even higher. A great advantage in comparison to plaster casting is the contactless and quick capturing of the traces. The benefit of the new handheld 3D-scanner in relation to previous solutions is the combination of high mobility with high data quality. Further application fields besides footwear and tyre traces are other forensic trace types as well as in medicine or archaeology.


Mobile 3D-scanner with attached digital camera.
© Fraunhofer IOF
Fig. 1: Mobile 3D-scanner with attached digital camera.
3D-scanner for mobile use to capture 3D information.
© Fraunhofer IOF
Fig. 2: 3D-scanner for mobile use to capture 3D information.
The 3D scan of the shoe print.
© Fraunhofer IOF
Fig. 3: Scan result of a shoe sole with marked details relevant for identification of criminals.


Authors: Roland Ramm, Ingo Schmidt, Peter Kühmstedt, Gunther Notni, Max Lucas (Lucas instruments GmbH)

High-speed 3D-measurement of airbag inflation

Airbag inflation demonstration: 3D data at four different points in time.
© Fraunhofer IOF
Airbag inflation demonstration: 3D data at different points in time.


Using optical active triangulation, an object’s surface can be reconstructed from 3D-measurement. This concept has been well established for several years, and provides high density information on the object’s form with high precision. Current systems can typically work at 3D rates of approximately 30 Hz.

The restricted temporal resolution only allows measurements before and after fast running processes. The actual dynamic change in the object’s form cannot be measured even at moderate change rates. The 3D rate is mainly restricted by the projection frequencies, i.e., the time required to switch projected images. Therefore the major challenge in achieving higher 3D rates is to develop faster projectors which also provide high amounts of light suited for short camera shutter times (~ 15 μs).

We have developed a projection system based on a gas discharge lamp with a luminous flux of almost 50000 lm. The system projects a so-called Aperiodic Sine Pattern, which was also developed at Fraunhofer IOF. In one second, the constructed scanner can provide 1200 independent 3D scans of 1 million points each. An important use of this system is in crash test research. In this field, innovative developments can reach series-production readiness much faster in a cost-efficient way because far fewer crash tests are required thanks to the significantly increased amount of data. We have successfully measured crash tests at a temporal and spatial resolution unreached with other systems.

By reducing the camera’s resolution, recording speed can be further increased so that even faster deformations can be measured. We have documented explosions of real airbags at a camera resolution of 500 x 500 pixels with a 3D rate of 5000 Hz. A whole deflation of an airbag lasting 26 ms can be recorded with 130 independent 3D data sets. A major advantage of our method is that the airbag does not need to be prepared in any way for the measurement (other systems require markers or special colour-coatings to be attached to the airbag). Thus, our scanner can record 3D information of this extremely fast process unaltered by preparation means.


High-speed 3D-measurement system.
© Fraunhofer IOF
Fig. 1: High-speed 3D-measurement system.


Authors: Peter Lutzke, Patrick Dietrich, Stefan Heist, Peter Kühmstedt, Gunther Notni

Do you have questions about our services?  

In a personal meeting, we will advise you on our (individual) range of services and our core competencies. Please contact us. 

Are you interested in a cooperation? Contact us!

We develop special and visionary solutions - tailored to the needs and wishes of our customers. Let us talk about your idea(s).


You would like to work with us?
Then apply with us!

We are always looking for creative minds and committed people who want to develop innovative solutions with light together with us. Visit our job portal or send us a speculative application: